
Discovering the joy of gluten-free cooking has been a game-changer for my meal planning, and I can’t wait to share these 12 amazing gluten-free fried rice recipes with you. From the comforting Classic Chicken Fried Rice to the tropical twist of Pineapple Shrimp Fried Rice, each dish promises vibrant flavors and ease. They’re perfect for those busy nights when you need something quick yet satisfying. Trust me, these recipes will become your go-to favorites. Let’s get started on adding some delicious variety to your meal routine!
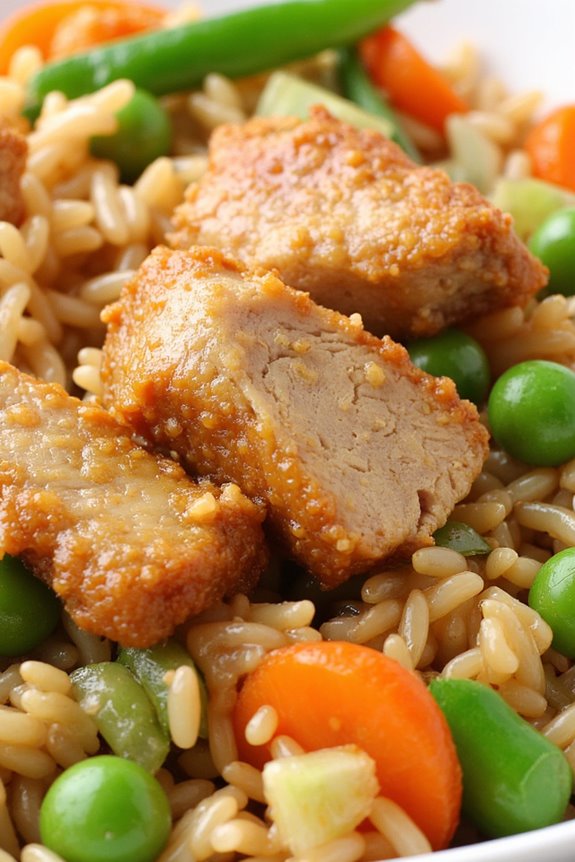
Classic Gluten-Free Chicken Fried Rice

Classic Gluten-Free Chicken Fried Rice is a delightful dish that marries the comforting flavors of traditional fried rice with the dietary needs of those avoiding gluten. This dish isn’t only easy to prepare but also incredibly versatile, allowing you to customize it with your favorite vegetables and proteins. The key to achieving the perfect fried rice lies in using leftover rice, which absorbs flavors beautifully and maintains the right texture.
With its savory combination of tender chicken, crisp vegetables, and umami-rich gluten-free soy sauce, this recipe is a surefire hit for a family meal or a quick weeknight dinner.
In this gluten-free version, the absence of gluten doesn’t mean a compromise on taste. Instead, it guarantees that everyone can indulge in this much-loved dish without worry. The ingredients are straightforward and readily available, making it convenient to whip up a batch whenever the craving strikes.
Whether you’re serving it as a main dish or a side, Classic Gluten-Free Chicken Fried Rice is sure to become a staple in your kitchen, satisfying both gluten-conscious eaters and fried rice enthusiasts alike.
Ingredients for 4-6 servings:
- 3 cups of cooked and chilled white rice (preferably a day old)
- 2 tablespoons of gluten-free soy sauce
- 1 tablespoon of sesame oil
- 2 tablespoons of vegetable oil
- 2 large eggs, beaten
- 1 pound of boneless, skinless chicken breast, diced
- 1 cup of frozen peas and carrots
- 4 green onions, sliced
- 3 cloves of garlic, minced
- Salt and pepper to taste
Cooking Instructions:
- Prepare the Rice: Begin by confirming that your cooked rice is cold and slightly dried out. Spread it out on a baking sheet and refrigerate for at least an hour if it’s freshly cooked.
- Cook the Chicken: Heat one tablespoon of vegetable oil in a large skillet or wok over medium-high heat. Add the diced chicken breast and season with salt and pepper. Stir-fry the chicken until it’s fully cooked and lightly browned, about 5-7 minutes. Remove the chicken from the skillet and set it aside.
- Scramble the Eggs: In the same skillet, add the beaten eggs. Stir continuously until they’re fully cooked and scrambled. Remove the eggs from the skillet and set them aside with the chicken.
- Sauté Vegetables: Add another tablespoon of vegetable oil to the skillet. Once hot, add the minced garlic, peas, and carrots. Sauté for 2-3 minutes until the vegetables are tender.
- Combine Ingredients: Increase the heat to high, then add the cold rice to the skillet with the vegetables. Stir well to break up any clumps of rice. Pour in the gluten-free soy sauce and sesame oil, stirring continuously to coat the rice evenly.
- Add Chicken and Eggs: Return the cooked chicken and scrambled eggs to the skillet. Toss everything together, ensuring all ingredients are well-mixed and heated through.
- Finish with Green Onions: Stir in the sliced green onions just before serving, allowing their fresh flavor to meld with the other ingredients.
Extra Tips:
To achieve the best texture for your fried rice, always use cold, day-old rice. This helps prevent the rice from becoming mushy during the stir-frying process. If you don’t have day-old rice, try spreading freshly cooked rice on a tray and chilling it in the fridge for a few hours.
Additionally, feel free to adjust the soy sauce and sesame oil to your liking or add more vegetables like bell peppers or broccoli for extra nutrition. Remember to constantly stir during cooking to avoid burning and guarantee even flavor distribution. Enjoy your Classic Gluten-Free Chicken Fried Rice with a side of gluten-free soy sauce for added flavor.
Spicy Thai Basil Fried Rice
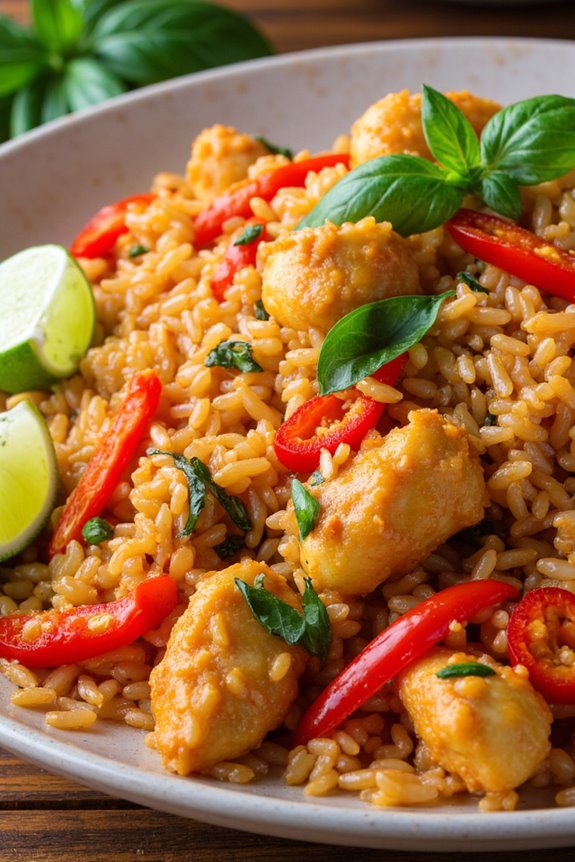
Spicy Thai Basil Fried Rice is a delightful dish that combines the aromatic flavors of Thai cuisine with the satisfying texture of fried rice. This gluten-free recipe features vibrant ingredients such as fresh basil, spicy chili peppers, and savory sauces, making it perfect for those looking to enjoy a flavorful meal without gluten. The dish isn’t only tasty but also quick to prepare, making it an excellent choice for a weeknight dinner or a special occasion meal.
The essence of Spicy Thai Basil Fried Rice lies in the balance of spicy, sweet, and savory flavors. Fresh Thai basil, known for its anise-like aroma, pairs beautifully with the heat from chili peppers and the umami notes from gluten-free soy sauce. By using day-old rice, the dish achieves the perfect texture, guaranteeing each grain is well-coated with the flavorful sauce. This recipe serves 4-6 people, making it ideal for a small gathering or family meal.
Ingredients:
- 4 cups of cooked jasmine rice (preferably day-old)
- 2 tablespoons vegetable oil
- 3 cloves garlic, minced
- 1 onion, sliced
- 1 red bell pepper, sliced
- 2-3 Thai bird’s eye chili peppers, finely chopped
- 1 pound boneless chicken breast, thinly sliced
- 3 tablespoons gluten-free soy sauce
- 1 tablespoon fish sauce
- 1 teaspoon sugar
- 1 cup fresh Thai basil leaves
- 2 eggs, lightly beaten
- Lime wedges for garnish
Cooking Instructions:
- Prepare the Ingredients: Begin by confirming all your ingredients are prepped and ready. Slice the chicken breast thinly, mince the garlic, slice the onion and bell pepper, and finely chop the chili peppers. This will make the cooking process smoother and quicker.
- Heat the Oil: In a large wok or skillet, heat the vegetable oil over medium-high heat. Once hot, add the minced garlic and sauté for about 30 seconds until fragrant. Be careful not to burn the garlic as it can turn bitter.
- Cook the Chicken: Add the sliced chicken breast to the wok. Stir-fry for about 4-5 minutes until the chicken is cooked through and lightly browned. Guarantee the chicken is evenly cooked by stirring continuously.
- Add Vegetables and Spices: Toss in the sliced onion, red bell pepper, and chopped chili peppers. Stir-fry the mixture for another 2 minutes until the vegetables are slightly tender but still crisp.
- Incorporate the Rice: Add the day-old jasmine rice to the wok, breaking up any clumps with your spatula. Stir everything together to combine well.
- Season the Rice: Pour in the gluten-free soy sauce, fish sauce, and sugar. Mix thoroughly to guarantee each grain of rice is coated with the sauce, giving the dish its characteristic savory flavor.
- Stir in the Eggs: Push the rice to one side of the wok and pour the beaten eggs into the empty space. Allow the eggs to set slightly before scrambling them and mixing them into the rice.
- Finish with Basil: Finally, add the fresh Thai basil leaves and stir them into the rice until they’re wilted and evenly distributed throughout the dish. This will add a fresh, aromatic flavor.
- Serve: Remove the wok from heat and transfer the Spicy Thai Basil Fried Rice to a serving platter. Garnish with lime wedges for an extra citrusy kick.
Extra Tips: When preparing Spicy Thai Basil Fried Rice, using day-old rice is key to achieving the best texture. Freshly cooked rice tends to be too moist and can result in a mushy dish. If you don’t have day-old rice, try spreading freshly cooked rice on a baking sheet and refrigerating it for at least an hour to dry it out slightly.
Additionally, adjust the number of chili peppers based on your spice tolerance, and consider using a splash of gluten-free tamari as an alternative to soy sauce if you prefer a wheat-free option.
Pineapple Shrimp Fried Rice
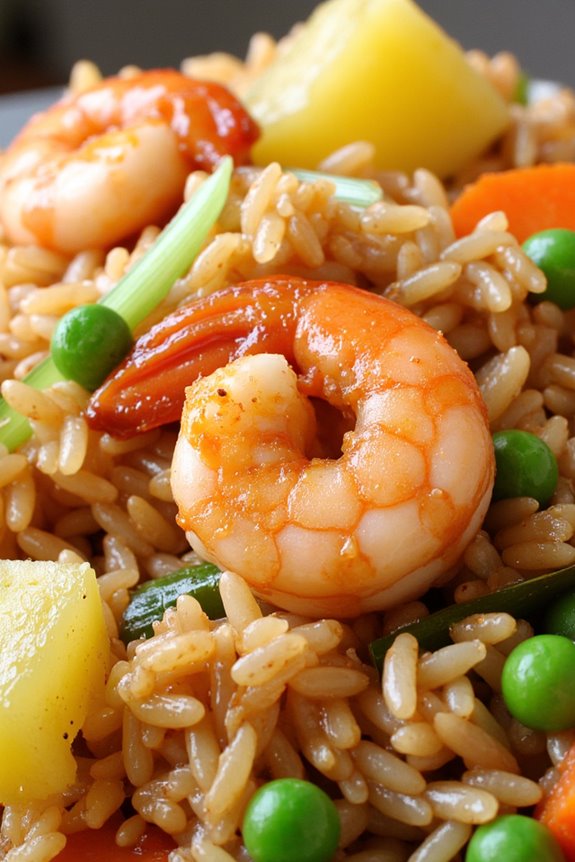
Pineapple Shrimp Fried Rice is a delicious and exotic twist on the classic fried rice dish, combining sweet and savory flavors that are sure to delight your taste buds. This gluten-free recipe is perfect for those who want to enjoy a healthy meal without compromising on taste. The combination of juicy shrimp, sweet pineapple chunks, and fresh vegetables creates a vibrant and colorful dish that’s as pleasing to the eye as it’s to the palate.
Whether you’re serving it as a main dish or a side, it’s sure to be a crowd-pleaser. This dish isn’t only quick and easy to prepare but also highly versatile. You can easily adjust the ingredients to suit your preferences or dietary needs. The key to achieving the perfect Pineapple Shrimp Fried Rice is to use cold, day-old rice, which guarantees that the grains remain separate and absorb the flavors beautifully.
The addition of soy sauce and sesame oil enhances the taste while maintaining the gluten-free requirement. This recipe serves 4-6 people, making it an excellent choice for family dinners or small gatherings.
Ingredients (Serving Size: 4-6 people):
- 4 cups cold cooked jasmine rice
- 1 pound large shrimp, peeled and deveined
- 1 tablespoon vegetable oil
- 2 cloves garlic, minced
- 1 cup pineapple chunks (fresh or canned, drained)
- 1 cup frozen peas and carrots, thawed
- 3 green onions, sliced
- 2 tablespoons gluten-free soy sauce
- 1 tablespoon sesame oil
- 1 teaspoon ground ginger
- 2 large eggs, beaten
- Salt and pepper to taste
Cooking Instructions:
- Prepare the Shrimp: Begin by heating 1 tablespoon of vegetable oil in a large skillet or wok over medium-high heat. Add the shrimp and cook for about 2-3 minutes on each side until they turn pink and are fully cooked. Remove the shrimp from the pan and set aside.
- Cook the Aromatics: In the same skillet, add the minced garlic and cook for about 30 seconds until fragrant. Be careful not to burn it.
- Add Vegetables: Stir in the peas and carrots, cooking for about 2-3 minutes until they’re tender. Then, add the pineapple chunks and sliced green onions to the skillet.
- Mix in the Rice: Add the cold jasmine rice to the pan, breaking up any clumps with a spatula. Stir everything together to combine.
- Season the Dish: Pour in the gluten-free soy sauce, sesame oil, and ground ginger. Mix well to confirm the rice is evenly coated with the sauce.
- Cook the Eggs: Push the rice mixture to one side of the pan. Pour the beaten eggs into the empty side. Allow the eggs to set slightly, then scramble them until fully cooked. Mix the scrambled eggs into the rice mixture.
- Combine and Serve: Return the cooked shrimp to the skillet. Stir everything together and cook for an additional 2 minutes to heat through. Season with salt and pepper to taste before serving.
Extra Tips:
For the best results, use day-old rice that has been refrigerated. Freshly cooked rice tends to be too moist and may result in a mushy texture. If you don’t have day-old rice, spread freshly cooked rice on a baking sheet and refrigerate it for at least an hour to dry it out.
Additionally, feel free to adjust the level of soy sauce and sesame oil to suit your taste preferences. For added heat, you can also include a pinch of red pepper flakes or a splash of sriracha sauce. Enjoy your Pineapple Shrimp Fried Rice with a sprinkle of extra green onions or a squeeze of lime juice for a fresh finish.
Vegetable Egg Fried Rice
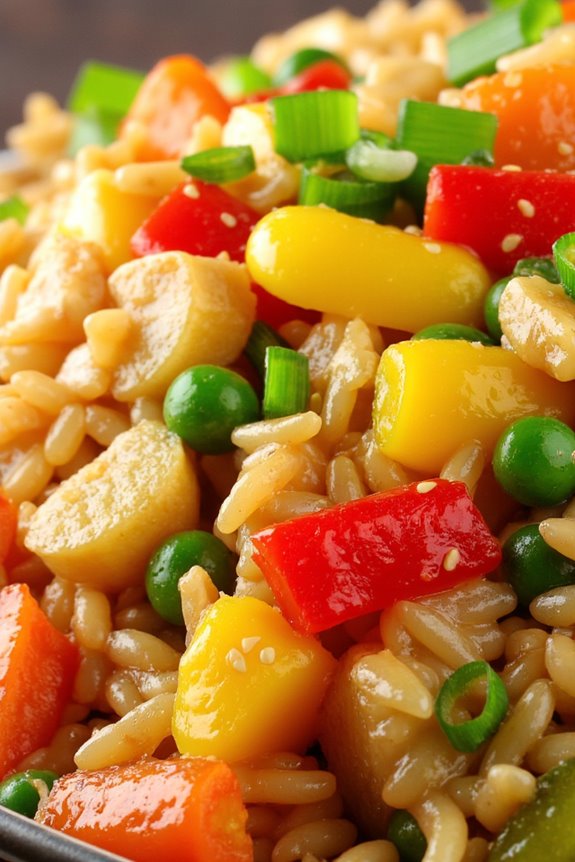
Vegetable Egg Fried Rice is a delightful gluten-free dish that combines the flavors of fresh vegetables and eggs with perfectly cooked rice. This recipe isn’t only nutritious but also simple to prepare, making it an ideal choice for a quick lunch or dinner.
The vibrant colors of the vegetables and the protein-rich eggs come together to create a satisfying, wholesome meal that can please even the pickiest eaters. Whether you’re following a gluten-free diet or just looking for a delicious fried rice recipe, this Vegetable Egg Fried Rice is guaranteed to become a favorite.
This dish is versatile and can be customized to suit your taste by adding your favorite vegetables or protein. The key to a great fried rice is using cold, day-old rice, which helps to prevent the rice from becoming mushy during the frying process.
This gluten-free version guarantees that everyone can enjoy this classic Asian-inspired dish without compromising on flavor or texture. With just a few simple ingredients and steps, you’ll have a delicious meal ready in no time.
Ingredients for 4-6 servings:
- 4 cups cold, cooked gluten-free rice
- 3 tablespoons vegetable oil
- 1 medium onion, diced
- 2 cloves garlic, minced
- 1 cup mixed bell peppers, diced (red, yellow, green)
- 1 cup frozen peas and carrots mix
- 3 large eggs, beaten
- 3 tablespoons gluten-free soy sauce
- 1 tablespoon sesame oil
- 3 green onions, chopped
- Salt and pepper, to taste
Instructions:
1. Prepare the ingredients: Before you start cooking, confirm all your ingredients are prepped and ready. Dice the onion and bell peppers, mince the garlic, and chop the green onions. Beat the eggs in a bowl and set everything aside.
2. Cook the vegetables: Heat 2 tablespoons of vegetable oil in a large pan or wok over medium-high heat. Add the onion and garlic, and sauté for about 2 minutes until the onion becomes translucent.
Then, add the bell peppers and the frozen peas and carrots mix. Stir-fry the vegetables for about 5 minutes until they’re slightly tender.
3. Scramble the eggs: Push the vegetables to one side of the pan. Pour the remaining tablespoon of oil into the empty side and add the beaten eggs. Allow the eggs to set for a few seconds, then scramble them with a spatula until fully cooked. Mix them with the vegetables.
4. Add the rice: Increase the heat to high and add the cold, cooked rice to the pan. Break up any clumps of rice with your spatula and stir everything together to combine the ingredients evenly.
5. Season the rice: Pour the gluten-free soy sauce and sesame oil over the rice. Stir well to confirm that all the rice is coated evenly with the sauce and oil. Continue to stir-fry for another 3-5 minutes until the rice is heated through and slightly crispy.
6. Finish and serve: Remove the pan from heat and stir in the chopped green onions. Taste and adjust seasoning with salt and pepper if needed. Serve the Vegetable Egg Fried Rice hot, either as a main dish or a side.
Extra Tips:
For best results, use rice that has been cooked and cooled at least a day in advance. This helps the grains to firm up and prevents them from sticking together during frying.
If you’re in a pinch, you can spread freshly cooked rice on a baking sheet and refrigerate it for an hour to speed up the cooling process. Additionally, feel free to customize the vegetables based on what you have on hand or your preferences—broccoli, snap peas, or zucchini can be great additions.
Remember to keep the pan or wok hot throughout the cooking process to achieve that signature ‘fried’ flavor and texture.
Kimchi Fried Rice
Kimchi Fried Rice is a delightful fusion of bold flavors and textures, offering a spicy and tangy twist to traditional fried rice. This dish is perfect for those who enjoy a bit of heat and the unique taste of fermented vegetables. Made with gluten-free soy sauce, it guarantees that everyone, regardless of dietary restrictions, can indulge in its savory goodness.
The combination of kimchi, rice, and a medley of vegetables creates a satisfying meal that’s both nourishing and delicious. This recipe is ideal for a quick weeknight dinner or a flavorful lunch. The preparation is straightforward, making it accessible even for novice cooks.
The key to a successful Kimchi Fried Rice lies in using day-old rice, which provides the perfect texture for frying. Additionally, the natural umami of kimchi paired with sesame oil adds depth to the dish, making it a standout meal that’s sure to please a crowd.
Ingredients (Serves 4-6):
- 4 cups of cooked, day-old white rice
- 2 cups of kimchi, chopped
- 1 tablespoon of kimchi juice
- 1 tablespoon of gluten-free soy sauce
- 1 tablespoon of sesame oil
- 2 tablespoons of vegetable oil
- 1 cup of carrot, diced
- 1 cup of green peas
- 4 green onions, sliced
- 3 garlic cloves, minced
- 6 eggs
- Salt and pepper to taste
- Sesame seeds for garnish (optional)
Instructions:
- Prepare the Rice: Begin by making sure your rice is properly chilled. If you haven’t already, spread freshly cooked rice on a baking sheet and refrigerate for at least an hour. This step is vital for achieving the right texture.
- Cook the Eggs: Heat a large skillet or wok over medium heat and add one tablespoon of vegetable oil. Beat the eggs in a bowl, season with a pinch of salt, and pour into the skillet. Cook, stirring occasionally until scrambled and just set. Remove the eggs from the skillet and set aside.
- Sauté Aromatics: In the same skillet, add the remaining vegetable oil. Once hot, add the minced garlic and sauté for about 30 seconds until fragrant.
- Add Vegetables: Stir in the diced carrots and cook for 2-3 minutes. Follow with the green peas and continue cooking until the vegetables are tender.
- Incorporate Kimchi: Add the chopped kimchi along with the kimchi juice to the skillet. Stir well to combine and cook for another 2 minutes to allow the flavors to meld.
- Combine with Rice: Increase the heat to medium-high and add the chilled rice to the skillet. Pour in the gluten-free soy sauce and sesame oil, stirring continuously to evenly coat the rice and prevent sticking.
- Finish with Eggs and Green Onions: Return the scrambled eggs to the skillet, breaking them into small pieces, and mix them into the rice. Add the sliced green onions, stirring until everything is well combined and heated through.
- Season and Serve: Taste and adjust seasoning with salt and pepper as needed. Garnish with sesame seeds if desired. Serve hot.
Extra Tips:
For an added layer of flavor, you can include a protein source such as diced chicken, shrimp, or tofu. Simply cook it after the eggs and before adding the vegetables.
Make sure the kimchi you use is gluten-free, as some brands may contain gluten. If you prefer more spice, add a teaspoon of gochujang (Korean chili paste) or a dash of hot sauce.
Finally, using a well-seasoned wok or non-stick skillet can help prevent the rice from sticking and make the cooking process smoother.
Garlic and Ginger Pork Fried Rice
Garlic and Ginger Pork Fried Rice is a delicious gluten-free dish that combines the savory flavors of pork with the aromatic hints of garlic and ginger. This dish is perfect for those who are sensitive to gluten but still want to enjoy a hearty, flavor-packed meal. The combination of tender pork, crisp vegetables, and the unique taste of gluten-free soy sauce makes this fried rice an unforgettable culinary experience.
Whether you’re serving this at a family dinner or a casual get-together, it’s sure to be a crowd-pleaser.
The key to making the perfect Garlic and Ginger Pork Fried Rice is to guarantee that all the ingredients are prepared and cooked with care. Using day-old rice is recommended as it’s less sticky, allowing it to absorb the flavors of the dish better. The use of fresh garlic and ginger is essential to bring out the authentic Asian flavors.
This recipe serves 4-6 people and is a great way to use up leftover rice and vegetables you might’ve in your fridge.
Ingredients (Serves 4-6)
- 4 cups of cooked, day-old jasmine rice
- 1 pound of pork tenderloin, thinly sliced
- 2 tablespoons gluten-free soy sauce
- 1 tablespoon sesame oil
- 2 tablespoons vegetable oil
- 2 cloves of garlic, minced
- 1 tablespoon fresh ginger, grated
- 1 cup frozen peas and carrots, thawed
- 4 green onions, chopped
- 2 large eggs, beaten
- Salt and pepper to taste
Cooking Instructions
- Prepare the Pork: In a medium bowl, marinate the sliced pork with 1 tablespoon of gluten-free soy sauce and a pinch of salt and pepper. Let it sit for at least 15 minutes to absorb the flavors.
- Cook the Pork: Heat 1 tablespoon of vegetable oil in a large skillet or wok over medium-high heat. Add the marinated pork slices and stir-fry until they’re browned and cooked through, about 5-7 minutes. Remove the pork from the skillet and set aside.
- Scramble the Eggs: In the same skillet, add a bit more oil if necessary, and pour in the beaten eggs. Stir gently until the eggs are just set and scrambled. Remove from the skillet and set aside with the pork.
- Sauté Aromatics: Add the remaining tablespoon of vegetable oil to the skillet. Stir in the minced garlic and grated ginger, and sauté for about 1 minute until fragrant.
- Cook the Vegetables: Add the thawed peas and carrots to the skillet. Stir-fry for 3-4 minutes until they’re tender.
- Combine All Ingredients: Return the cooked pork and scrambled eggs to the skillet. Add the cooked rice, remaining 1 tablespoon of gluten-free soy sauce, and sesame oil. Stir well to combine all ingredients.
- Finish with Green Onions: Add the chopped green onions and stir everything together for another 2 minutes. Season with additional salt and pepper if needed.
- Serve: Transfer the fried rice to a serving platter and enjoy it hot.
Extra Tips
For best results, use rice that has been cooked and cooled overnight as it will be less sticky and easier to fry. Make sure to have all your ingredients prepared and ready to go before you start cooking, as the process moves quickly.
Adjust the seasoning according to your taste preference; adding a bit more soy sauce or sesame oil can enhance the flavors. If you prefer a spicier dish, consider adding a dash of chili oil or red pepper flakes.
Teriyaki Beef Fried Rice

Craving a delicious and hearty meal that’s gluten-free? Search no further than Teriyaki Beef Fried Rice. This dish combines the savory flavors of tender beef, the sweetness of teriyaki sauce, and the comforting texture of fried rice, all while making sure it meets gluten-free dietary needs. Perfect for family dinners or a special gathering, this dish is both satisfying and easy to prepare.
With just a few simple ingredients, you can whip up a meal that everyone will enjoy. Teriyaki Beef Fried Rice isn’t only rich in flavor but also packed with nutrients. Using gluten-free soy sauce and carefully selected ingredients, this recipe guarantees that those with gluten sensitivities can indulge without worry.
The combination of beef, vegetables, rice, and the unique tang of teriyaki sauce creates a symphony of flavors that will have everyone coming back for more. Whether you’re a seasoned chef or new to cooking, this recipe is straightforward and perfect for any skill level.
Ingredients (Serves 4-6):
- 2 cups jasmine rice, cooked and cooled
- 1 pound beef sirloin, thinly sliced
- 2 tablespoons vegetable oil
- 1 medium onion, diced
- 2 cloves garlic, minced
- 1 cup frozen peas and carrots mix
- 3 tablespoons gluten-free soy sauce
- 2 tablespoons gluten-free teriyaki sauce
- 2 eggs, beaten
- 3 green onions, sliced
- Salt and pepper to taste
Cooking Instructions:
- Prepare the Beef: In a medium-sized bowl, marinate the beef slices with 1 tablespoon of gluten-free soy sauce and 1 tablespoon of gluten-free teriyaki sauce. Let it sit for about 15 minutes to absorb the flavors.
- Cook the Beef: Heat 1 tablespoon of vegetable oil in a large skillet or wok over medium-high heat. Add the marinated beef slices and cook for about 3-4 minutes until browned and cooked through. Remove the beef from the skillet and set aside.
- Sauté the Vegetables: In the same skillet, add the remaining tablespoon of vegetable oil. Add the diced onion and minced garlic, sautéing until the onion becomes translucent. Then, add the frozen peas and carrots mix, cooking for another 2-3 minutes until they’re tender.
- Scramble the Eggs: Push the vegetables to one side of the skillet and pour the beaten eggs into the empty side. Scramble the eggs until fully cooked, then mix them with the vegetables.
- Combine Ingredients: Add the cooked and cooled jasmine rice to the skillet. Pour in the remaining gluten-free soy sauce and teriyaki sauce, stirring well to combine all ingredients evenly.
- Finish with Beef and Green Onions: Return the cooked beef to the skillet, mixing it with the rice and vegetables. Cook for another 2 minutes to heat through. Finally, sprinkle the sliced green onions over the top, and add salt and pepper to taste.
Extra Tips:
For best results, use day-old rice as it tends to be less sticky and absorbs flavors more effectively. If you don’t have time to cook rice in advance, spread freshly cooked rice on a baking sheet and refrigerate for 30 minutes to cool it down.
Also, when slicing the beef, aim for thin slices to guarantee quick and even cooking. Feel free to personalize the dish by adding your favorite vegetables or proteins, and adjust the soy and teriyaki sauce to suit your taste preferences.
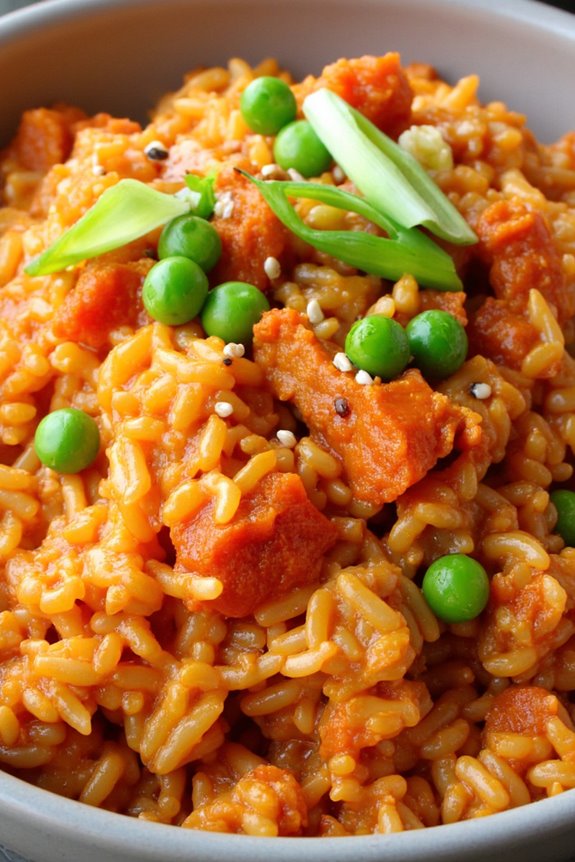
Coconut Curry Fried Rice
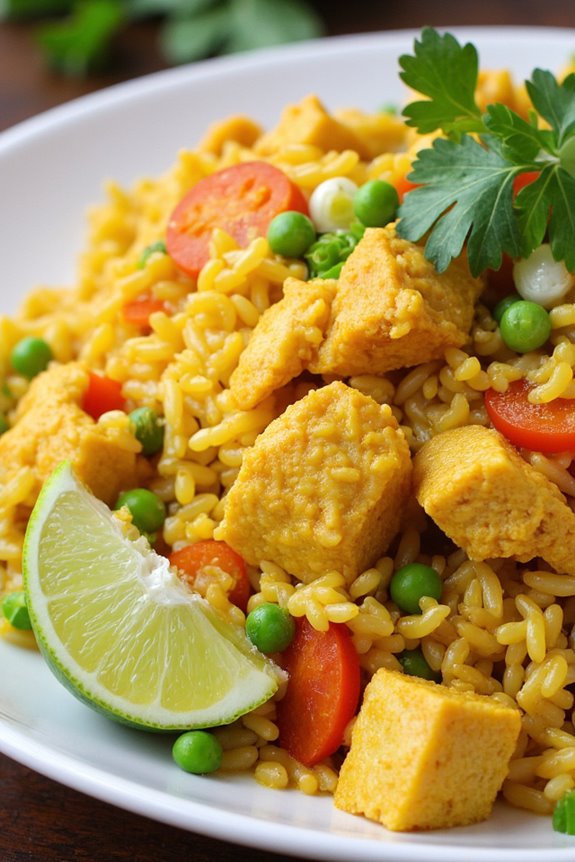
Coconut Curry Fried Rice is a delectable twist on the traditional fried rice, infused with the rich and creamy flavor of coconut milk and the aromatic spices of curry powder. This gluten-free dish is perfect for those who love bold flavors and want to enjoy a comforting meal that’s both satisfying and nutritious.
Whether you’re serving it as a main course or a side dish, this Coconut Curry Fried Rice is sure to be a hit with family and friends. The combination of fluffy rice, vibrant vegetables, and tender protein, all enveloped in a luscious coconut curry sauce, makes for a truly irresistible dish.
The recipe is versatile, allowing you to customize it with your choice of vegetables and protein, making it suitable for various dietary preferences. This Coconut Curry Fried Rice isn’t only delicious but also easy to prepare, making it an ideal option for busy weeknights or special occasions.
Ingredients for Coconut Curry Fried Rice (serves 4-6):
- 3 cups cooked jasmine rice (preferably day-old)
- 1 tablespoon coconut oil
- 1 medium onion, diced
- 2 cloves garlic, minced
- 1 tablespoon fresh ginger, grated
- 1 red bell pepper, diced
- 1 cup frozen peas and carrots mix
- 1 cup coconut milk
- 2 tablespoons curry powder
- 1 tablespoon soy sauce (gluten-free)
- 1 teaspoon turmeric
- 1 cup cooked chicken breast or tofu, cubed
- 2 green onions, sliced
- Salt and pepper to taste
- Fresh cilantro, for garnish (optional)
- Lime wedges, for serving
Cooking Instructions:
- Prepare the Rice: If possible, use day-old rice as it’s drier and prevents the dish from becoming mushy. If using freshly cooked rice, spread it on a baking sheet to cool and dry slightly.
- Heat the Oil: In a large skillet or wok, heat the coconut oil over medium heat until melted and shimmering.
- Sauté Aromatics: Add the diced onion, garlic, and grated ginger to the skillet. Sauté for about 2-3 minutes until the onion becomes translucent and the mixture is fragrant.
- Cook Vegetables: Stir in the red bell pepper and the frozen peas and carrots mix. Cook for about 3-4 minutes until the vegetables are tender.
- Add Curry Sauce: Pour in the coconut milk, curry powder, soy sauce, and turmeric. Stir well to combine all the ingredients and bring the mixture to a gentle simmer.
- Incorporate Protein: Add the cooked chicken breast or tofu to the skillet, stirring to coat the pieces in the curry sauce. Cook for an additional 2-3 minutes to heat through.
- Combine with Rice: Gently fold in the cooked rice, making certain that it’s well coated with the curry sauce. Cook for another 5 minutes, stirring occasionally, until the rice is heated through and evenly mixed with the other ingredients.
- Finish with Seasoning: Season the fried rice with salt and pepper to taste. Stir in the sliced green onions just before removing the skillet from heat.
- Serve and Garnish: Transfer the Coconut Curry Fried Rice to a serving platter. Garnish with fresh cilantro and serve with lime wedges on the side for an extra burst of flavor.
Extra Tips:
For the best results, verify the rice is cold before adding it to the skillet; this helps it maintain its texture and prevents the dish from becoming too sticky.
Consider adding additional vegetables like broccoli or snap peas for extra crunch and nutrition. If you prefer a spicier version, add a pinch of red pepper flakes or a chopped chili pepper during the sautéing process.
Finally, always adjust the seasoning to your taste preference, as the flavor profile can vary based on the type of curry powder used.
Lemon Herb Quinoa Fried Rice

Lemon Herb Quinoa Fried Rice is a delightful twist on the traditional fried rice, offering a gluten-free alternative that’s full of vibrant flavors and wholesome ingredients. By substituting quinoa for rice, this dish not only caters to those with gluten sensitivities but also provides a nutritious boost. The addition of fresh herbs and a hint of lemon elevates the taste, making it a perfect option for a light lunch or a satisfying dinner.
It’s a versatile dish that pairs beautifully with grilled chicken or tofu, or can be enjoyed on its own as a flavorful vegetarian meal. This recipe serves 4-6 people and is ideal for those seeking a quick and easy meal that’s both healthy and delicious. The key to a great Lemon Herb Quinoa Fried Rice lies in the balance of fresh ingredients and the perfect combination of flavors.
The lemon imparts a zesty brightness, while the herbs add aromatic depth, creating a dish that’s as pleasing to the palate as it’s to the eyes. Whether you’re cooking for your family or entertaining guests, this gluten-free fried rice is sure to impress.
Ingredients:
- 2 cups quinoa, rinsed and drained
- 4 cups water
- 2 tablespoons olive oil
- 1 medium onion, finely chopped
- 2 cloves garlic, minced
- 1 cup frozen peas
- 1 red bell pepper, diced
- 3 tablespoons fresh lemon juice
- Zest of 1 lemon
- 1 teaspoon salt
- 1/2 teaspoon black pepper
- 1/2 cup chopped fresh parsley
- 1/4 cup chopped fresh basil
- 3 green onions, sliced
- Optional: 2 eggs, beaten
Cooking Instructions:
- Cook the Quinoa: In a medium-sized pot, combine the rinsed quinoa and water. Bring to a boil, then reduce the heat to low and cover. Simmer for about 15 minutes or until the quinoa is tender and the water is absorbed. Fluff with a fork and set aside.
- Prepare the Aromatics: In a large skillet or wok, heat the olive oil over medium heat. Add the chopped onion and garlic, and sauté until the onion is translucent and fragrant, about 3-4 minutes.
- Add Vegetables: Stir in the frozen peas and diced red bell pepper. Cook for about 5 minutes, or until the vegetables are tender yet still vibrant in color.
- Combine Ingredients: Add the cooked quinoa to the skillet with the vegetables. Stir well to combine and allow the ingredients to heat through.
- Flavor the Dish: Pour in the fresh lemon juice and add the lemon zest, salt, and black pepper. Mix well to guarantee the quinoa and vegetables are evenly coated with the lemony flavor.
- Incorporate the Herbs: Stir in the chopped parsley, basil, and sliced green onions. If using eggs, create a well in the center of the skillet and pour in the beaten eggs. Allow them to cook, stirring occasionally, until they’re fully cooked and integrated into the dish.
- Serve: Once everything is well combined and heated through, remove from the heat. Serve warm, garnished with extra parsley or green onions if desired.
Extra Tips:
For best results, use freshly cooked quinoa that’s cooled slightly. This prevents the dish from becoming too mushy. If you prefer a bit of crunch, consider adding some nuts or seeds such as toasted almonds or sunflower seeds.
Additionally, feel free to customize the herbs to your taste; cilantro or mint can be wonderful substitutes or additions. If you’re in the mood for some protein, grilled shrimp or chicken can be added to make the dish even heartier. Finally, always taste and adjust the seasoning before serving to guarantee the flavors are just right.
Mushroom and Spinach Fried Rice
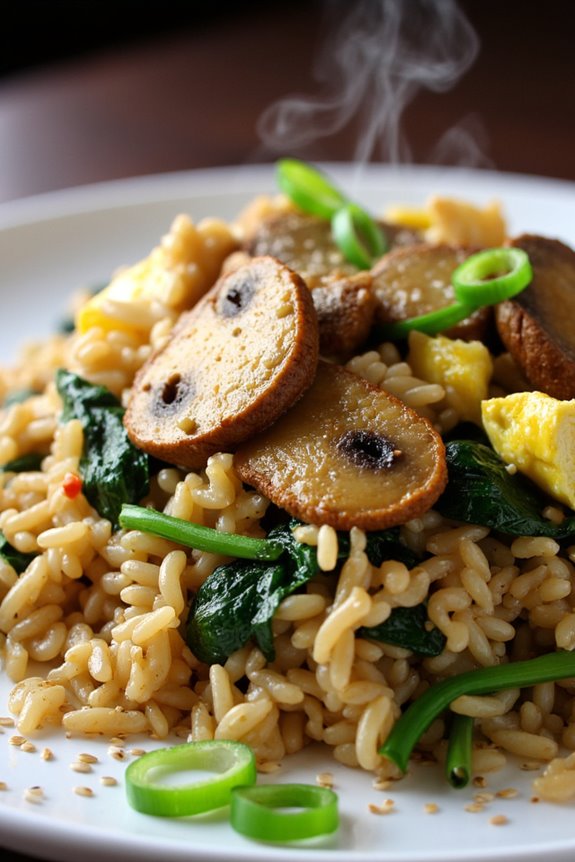
Mushroom and Spinach Fried Rice is a delicious and nutritious gluten-free dish that’s perfect for a quick lunch or dinner. This recipe combines the earthy flavors of mushrooms with the freshness of spinach, all tossed together with perfectly cooked rice. The dish isn’t only easy to prepare but also packed with nutrients, making it a delightful option for those who are following a gluten-free diet.
With its vibrant colors and robust flavors, Mushroom and Spinach Fried Rice is sure to be a hit with family and friends.
The key to this dish is using day-old rice, which helps to achieve the perfect texture for fried rice. Freshly cooked rice tends to be too moist and can become mushy when stir-fried. The mushrooms add a meaty texture and deep flavor, while the spinach adds a pop of color and a boost of vitamins. A touch of gluten-free soy sauce ties all the flavors together, making this dish not only visually appealing but also satisfying to the palate.
Serve it as a main dish or as a side to your favorite protein for a complete meal.
Ingredients for 4-6 servings:
- 4 cups cooked and cooled white or brown rice
- 2 tablespoons vegetable oil
- 1 large onion, finely chopped
- 3 cloves garlic, minced
- 2 cups sliced mushrooms (e.g., button, cremini, or shiitake)
- 2 cups fresh spinach, roughly chopped
- 3 tablespoons gluten-free soy sauce
- 1 tablespoon sesame oil
- 2 eggs, lightly beaten
- 1/2 teaspoon salt
- 1/4 teaspoon black pepper
- 2 green onions, sliced
- Optional: sesame seeds for garnish
Cooking Instructions:
1. Prepare the Ingredients:
Begin by gathering all your ingredients. Confirm that your rice is cooked and cooled, as day-old rice works best for fried rice. Slice the mushrooms and chop the spinach, onions, and green onions.
2. Heat the Oil:
In a large non-stick skillet or wok, heat the vegetable oil over medium-high heat. Once the oil is hot, add the chopped onion and garlic. Sauté for about 2-3 minutes until the onion becomes translucent and the garlic is fragrant.
3. Cook the Mushrooms:
Add the sliced mushrooms to the pan and cook for another 5 minutes, stirring occasionally, until the mushrooms are tender and have released their moisture.
4. Add the Spinach:
Stir in the chopped spinach and cook until it has wilted, which should take about 2 minutes.
5. Scramble the Eggs:
Push the vegetable mixture to one side of the pan. Pour the beaten eggs into the empty side of the pan. Allow them to cook for a minute, then scramble them gently until fully cooked.
6. Combine Ingredients:
Mix the scrambled eggs with the vegetable mixture. Add the cooled rice, breaking up any clumps with a spatula.
7. Season the Rice:
Pour the gluten-free soy sauce and sesame oil over the rice. Season with salt and black pepper. Stir everything together, making sure the rice and vegetables are evenly coated with the sauce.
8. Final Touches:
Add the sliced green onions and stir well. Cook for an additional 2-3 minutes until everything is heated through.
9. Serve:
Transfer the fried rice to a serving dish. Optionally, garnish with sesame seeds before serving.
Extra Tips:
For an extra protein boost, you can add cooked chicken, shrimp, or tofu to this dish. If you prefer a bit of spice, consider adding a pinch of red pepper flakes or a splash of gluten-free hot sauce.
It’s important to use a large enough pan to allow the rice to fry properly without steaming. If you don’t have day-old rice, cook fresh rice, spread it on a baking sheet, and refrigerate it for at least an hour to cool and dry out slightly.
Sweet and Sour Tofu Fried Rice

Sweet and Sour Tofu Fried Rice is a delightful twist on a classic dish, combining the tangy flavors of sweet and sour tofu with the savory comfort of fried rice. This gluten-free recipe is perfect for those looking to enjoy a tasty and nutritious meal without compromising on flavor. The tofu is marinated and cooked to perfection, allowing it to absorb the sweet and sour sauce, which beautifully complements the fluffy rice and crisp vegetables.
This dish isn’t only delicious but also packed with nutrients, making it an ideal choice for a family dinner or a satisfying lunch. The combination of colorful vegetables, protein-rich tofu, and aromatic spices creates a harmonious balance of flavors and textures. Whether you’re a seasoned chef or a novice in the kitchen, this Sweet and Sour Tofu Fried Rice recipe is easy to follow and sure to impress your taste buds.
Ingredients (Serves 4-6):
- 1 1/2 cups uncooked jasmine rice
- 1 block (14 oz) firm tofu
- 2 tablespoons gluten-free soy sauce
- 2 tablespoons cornstarch
- 1 red bell pepper, diced
- 1 cup pineapple chunks (fresh or canned)
- 1 cup frozen peas and carrots mix
- 1 small onion, diced
- 3 cloves garlic, minced
- 2 tablespoons vegetable oil
- 3 tablespoons gluten-free sweet and sour sauce
- 2 eggs, beaten (optional)
- Salt and pepper to taste
- Green onions, chopped (for garnish)
Cooking Instructions:
- Prepare the Rice: Begin by cooking the jasmine rice according to package instructions. Once cooked, spread it out on a baking sheet to cool. This helps to prevent the rice from becoming mushy when fried.
- Marinate the Tofu: Cut the tofu into 1-inch cubes and pat dry with a paper towel to remove excess moisture. In a small bowl, combine the gluten-free soy sauce and cornstarch. Toss the tofu cubes in this mixture until well-coated. Set aside for at least 15 minutes to marinate.
- Cook the Tofu: Heat 1 tablespoon of vegetable oil in a large non-stick pan over medium heat. Add the marinated tofu cubes and cook until they’re golden brown on all sides, about 8-10 minutes. Remove the tofu from the pan and set aside.
- Sauté the Vegetables: In the same pan, add another tablespoon of vegetable oil. Add the diced onion and minced garlic, and sauté until the onion becomes translucent. Then, add the diced red bell pepper, pineapple chunks, and the peas and carrots mix. Cook for 5-7 minutes, stirring occasionally, until the vegetables are tender.
- Combine Ingredients: Push the sautéed vegetables to one side of the pan and pour the beaten eggs (if using) into the empty space. Scramble the eggs until fully cooked, then mix them with the vegetables. Add the cooled rice to the pan, followed by the cooked tofu and the sweet and sour sauce. Stir everything together until well combined and heated through.
- Season and Serve: Season the fried rice with salt and pepper to taste. Garnish with chopped green onions before serving.
Extra Tips:
To guarantee the best texture for your fried rice, use day-old rice or rice that has been cooled and refrigerated. This helps the grains remain separate and prevents clumping.
If you prefer a bit of heat, consider adding a pinch of red pepper flakes or a splash of sriracha to the sweet and sour sauce. For a more robust flavor, you can add a splash of sesame oil during the final stir-fry step.
Finally, feel free to customize the vegetables based on what you have on hand or prefer. Enjoy your gluten-free Sweet and Sour Tofu Fried Rice!
Cajun Sausage Fried Rice
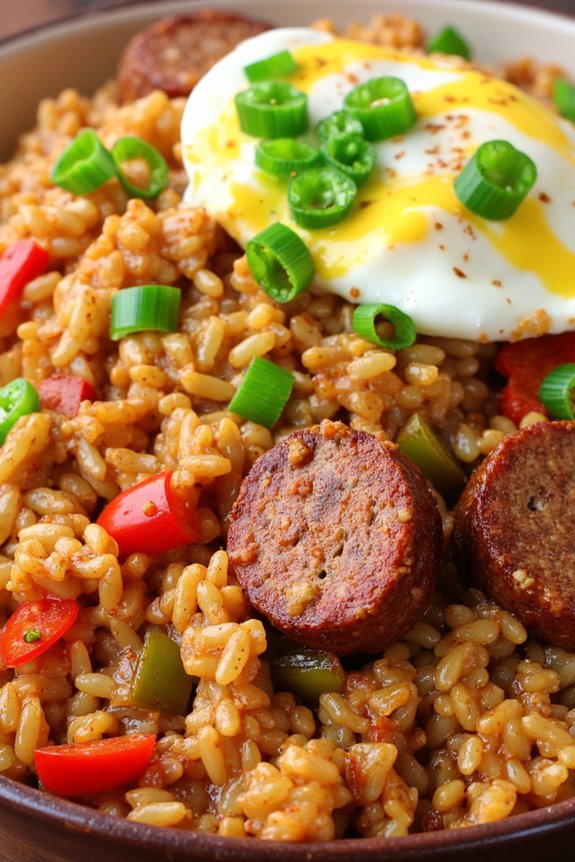
Cajun Sausage Fried Rice is a flavorful and satisfying dish that combines the spicy, smoky flavors of Cajun sausage with the versatility and comfort of fried rice. This gluten-free recipe is perfect for those who love a bit of heat and crave a quick yet hearty meal. The combination of vibrant bell peppers, aromatic onions, and the savory depth of Cajun spices make this fried rice a standout dish on any table.
Whether you’re looking to spice up a weeknight dinner or impress guests at a gathering, this recipe is guaranteed to deliver excitement to your taste buds. This dish isn’t only delicious but also incredibly easy to prepare, making it ideal for busy individuals or families. The use of gluten-free soy sauce guarantees that those with gluten sensitivities can enjoy this meal without worry.
By incorporating leftover rice, you can reduce waste and create a dish that’s both economical and satisfying. The Cajun Sausage Fried Rice is a versatile recipe that you can easily adapt by adding your favorite vegetables or proteins, allowing you to customize it to your liking.
Ingredients (Serves 4-6):
- 2 cups cooked jasmine or basmati rice (preferably day-old)
- 1 tablespoon olive oil
- 12 ounces Cajun sausage, sliced
- 1 red bell pepper, diced
- 1 green bell pepper, diced
- 1 medium onion, diced
- 2 cloves garlic, minced
- 2 eggs, beaten
- 3 tablespoons gluten-free soy sauce
- 1 teaspoon Cajun seasoning
- Salt and pepper to taste
- 2 green onions, chopped (for garnish)
Cooking Instructions:
- Prepare the Ingredients: Before starting, confirm that all your ingredients are prepped and ready to go. Dice the bell peppers and onion, mince the garlic, and slice the Cajun sausage. This will make the cooking process smoother and quicker.
- Cook the Sausage: In a large skillet or wok, heat the olive oil over medium-high heat. Add the sliced Cajun sausage and cook for about 4-5 minutes, stirring occasionally, until the sausage is browned and cooked through. Remove the sausage from the skillet and set aside.
- Sauté Vegetables: In the same skillet, add the diced onion and bell peppers. Cook for 3-4 minutes, or until they start to soften. Add the minced garlic and cook for an additional 1-2 minutes until fragrant.
- Scramble the Eggs: Push the vegetables to one side of the skillet and pour the beaten eggs into the other side. Allow the eggs to sit for a few moments, then scramble them gently until fully cooked.
- Combine Ingredients: Add the cooked rice to the skillet, stirring well to combine with the vegetables and eggs. Pour in the gluten-free soy sauce and Cajun seasoning, mixing thoroughly to confirm every grain of rice is coated.
- Add Sausage and Season: Return the cooked sausage to the skillet and stir everything together. Season with salt and pepper to taste, allowing the flavors to meld for another 2-3 minutes over heat.
- Garnish and Serve: Remove the skillet from the heat and sprinkle the chopped green onions over the top. Serve the Cajun Sausage Fried Rice hot, enjoying it as a standalone dish or alongside your favorite sides.
Extra Tips: To achieve the best texture for your fried rice, it’s recommended to use day-old rice, as it’s drier and less sticky than freshly cooked rice. If you only have freshly cooked rice, spread it out on a tray and let it cool in the refrigerator for about an hour before using.
Adjust the level of spice by modifying the amount of Cajun seasoning according to your preference. Feel free to add other vegetables like peas or carrots for additional color and nutrition.